Contents:
-
Introduction.
-
Part One: Setting up a Photoshop Project.
-
Part Two: Choosing the background colours and adjusting the gradient.
-
Part Three: Creating and using images in Photoshop.
-
Part Four: Saving your project as an image file.
-
Summary/Conclusion:
Introduction:
Welcome to the first Photoshop tutorial in a set of five Word press tutorials. For this tutorial I will guide you through the necessary steps and stages to creating a still image in Photoshop. For this tutorial you will be producing an image of a Storm.
This tutorial will contain specific areas that will be covered. These areas will include:
- How to set up a project in Photoshop along with the particular dimensions that will be required for the project.
- How create and manage layers.
- How to create/draw and use shapes in Photoshop.
- How to apply fill affects.
This tutorial will be divided into different sections in order to provide ease of use it terms of navigating the tutorial. The contents section above will allow you to jump to any section of the blog.
Part One: Setting up a Photoshop project.
First thing, open up Photoshop so that we can start the project. In order to set up Photoshop you will need to click FILE then NEW which will open up a dialog box so that you can name the project and set the properties.
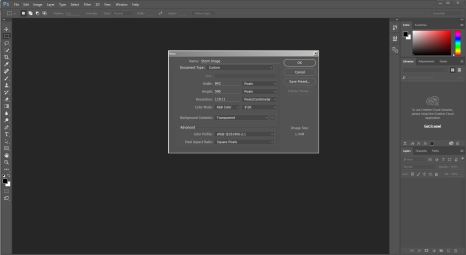
For the purposes of this project, change the width and height from the centimetre setting to the pixel setting and change the dimensions to 595 for the height and 842 for the width. As soon as this has been achieved click the OK button in order to finish setting up the project. As soon as the project has been successfully been set up a white and grey checkered background will appear as demonstrated in the image below.
Part two: Choosing the background colours and adjusting the gradient.
For this next step, you will need to choose both the foreground and background colours.
This can be achieved by clicking, in the corner of Photoshop, on the small black box (for the foreground colour) and white box (for the background colour) which can be seen below.

In order to set the background to the required setting, click on the white box which result in a dialog box appearing which will allow the user to select the desired colour.

For the purposes of this tutorial, set the colour values to the numbers that can be seen above. The resulting colour should be a form of Dark Blue. Click the OK button when the correct background colour has been selected.
Now follow the same steps but for the foreground colour. The resulting colour should end up being Grey. Click on OK when the correct foreground colour has been selected.
Now that both the foreground and background colours have been set, we can now proceed with creating the gradient fill effect for the background. The first step in achieving this is to right click on the paint bucket icon, below the eraser icon, on the tools panel on the left hand side of the Photoshop user interface.
Right clicking on the icon will cause a list of select options to appear. From the list of fill options that will appear click the gradient icon which is the square image with a gradient effect.

The gradient tool has successfully been selected so we can now proceed with creating the gradient effect that we using the foreground and background colours that we set earlier on in the tutorial.
When the gradient tool is selected the cursor will take the form of a cross symbol. This tells us that we are ready to create our gradient fill effect for the Background layer. In order to create the correct gradient effect, move the cursor towards the center then click towards the bottom of the project then drag the line towards the top of the project space while maintaining a straight line through the center of the Photoshop screen.
You may use the image below as an aid in achieving this stage of the tutorial.

At this stage it is a good idea to change the name of the background layer to something far more distinguishable. All you need to do is double click on the name of the layer in the layer section of the Photoshop user interface and rename the layer to ‘Background’.
Consult the following image if required:

Part three: Creating and using images in Photoshop.
Now that we have the background the way we want it we can no move on to the next stage of creating the storm image content for the Photoshop image. This stage in the tutorial will involve of both cloud image content and thunder and lightning image content.
The important first task that we need to do is to select the shape that we will need to start with.

In order to select the required shape, you will need to right click on the rectangle icon which is located above the hand icon. From the drop down menu that appears click on the ellipse tool icon as the shape that we need so that we can create a cloud shape.
In order to create a cloud shape we will need to draw multiple shapes but first start by drawing one in the top left region of the project space.

We now need to change the colour of the shape to grey. All that is required is to simply go to the properties of the layer and change the fill colour to grey.

With the correct fill/colour established we need to duplicate the ellipse layer multiple times so that we use them to form a cloud shape. There are two ways of duplicating which are very easy. You can either right click on the intended layer and click ‘Duplicate Layer’ or go to the ‘Layer’ menu at the top and also click on duplicate layer.

Move all of the ellipse around until you have something resembling the cloud shape in the image above.
At this particular moment in our Photoshop endeavours we are faced with a slight dilemma in that all of the shapes that we used to create are all in separate layers.
You need not fear my fellow Photoshop enthusiasts, the solution is simple. All you must do is click on the most top layer and then, while holding shift, click on the most bottom layer of the layers that you want to group which is all of the ellipse layers. With the layers selected simply drag them to the folder icon at the bottom of the layer tools. This will form a group with all of the layers inside. For convenience, make sure you rename the group to ‘Cloud’ or ‘Cloud 1’. As a result of this we can now move the cloud shape as a whole.
Well done folks for making it this far.
You know what they say. Two clouds are better than one. So lets go ahead and duplicate the layer so that we can have another one.
Duplicating the cloud group is easy just make sure that the Cloud group layer is selected.
Follow the duplication steps we carried out earlier and everything should be fine and dandy. Name the new cloud ‘Cloud 2’ and move the new cloud to a suitable location.
At this point you should have two clouds as the image below depicts.

Another cool feature of Photoshop is that we can using blending options to edit how the clouds appear. Simply do this by right clicking on ‘Cloud 1’ and select ‘Blending Options’. A box will appear with a list of options for blending. In order to achieve the desired cloud effect select ‘Bevel and Emboss’, ‘Inner Shadow’, ‘Inner Glow’, ‘Outer Glow’ and ‘Drop Shadow’. Carry out the same for ‘Cloud 2’.
We have the clouds, now we just need the lightning so that we can bring to an end the first segment of this joint venture of ours.
For the lightning bolt we will need a different type of drawing tool in order to create a lightning effect. For the lightning you need to return to the shape tool (where we previously selected the ellipse drawing tool), right click to open the sub menu and select the line tool.
For the purposes of this exercise, hiding the background may make it easier to draw the lightning bolt. To do this simply click on the eye next to where the background layer is in the list of project layers.
You can now proceed with creating a lightning bolt using the line tool.
You should end up with something like this.

Important things to remember to do:
- Make sure that you group the layers for the lines used to create the lightning bolt so it can be moved around easily.
- Make sure the cloud layers are in front of the lightning bolt layer. You can achieve this by clicking on the ‘Layer’ menu then ‘Arrange’. For the lightning bolt layer select ‘Send Backward’ and for the cloud layers select ‘Bring forward’.
As soon as you are happy with the lightning shape you have drawn in Photoshop, we can now apply a fill as well as any additional effects. This is really important, before you apply a fill to the lightning bolt you will need to merge the layers within the group so that it can be filled with colour. This can be achieved by right clicking on the lighting bolt group layer and clicking on merge group.
For the lightning bolt layer, right click where the gradient tool is and select the paint bucket tool. Then go to the panel on the right and click on ‘Swatches’ and select ‘RGB Yellow’ as the fill colour then fill the lightning bolt.
You also need to apply these blending options:
- Bevel and Emboss.
- Outer Shadow.
- Drop Shadow.
To finish off the Storm Image, duplicate the lightning bolt layer three times so that you have four lightning bolts. Then place each lightning bolt slightly under the clouds so top of the lighting bolts are not visible. Each cloud should have two lightning bolts.
Your Storm Image should look something like this:

If you are happy with how your Storm Image looks you can proceed with saving your Photoshop project as an image file.
Part Four: Saving your project as an image file.
To export your project as an image with a suitable file format all that you need to do is to go to ‘File’, ‘Export’ then ‘Export as’. This will cause a box to open which allow you to decide which image format you would like.

Click on the ‘Format’ drop down menu to change the file format. The file formats include JPG, PNG, GIF and SVG. For the purposes of this tutorial the image has been saved as a JPG.
Summary/conclusion:
WELL DONE!!!
You have completed the first in a series of Multimedia tutorials.
In this tutorial we have covered:
- How to setup a project in Photoshop.
- How to apply a fill and a gradient.
- How to create shapes in Photoshop.
- How to apply blending effects.
- How to use and manage layers in Photoshop.
- How to save a Photoshop project as an image file.
Within the next tutorial we shall be exploring animation within Photoshop.
To all my readers out there, I hope you found my first tutorial to be beneficial to your Photoshop info needs and I look forward to imparting more wisdom to you soon.
See you soon,
Mike.
