Posted in Audacity, Multimedia Tutorial Five: The Final Project., Multimedia Tutorials, Photoshop Tutorials, Premiere Pro

Multimedia Tutorial 5: The Final Multimedia Project.

Contents:

Recap/Introduction:

Hey there Folks.

This is the moment we have all been waiting for. It is now time to apply everything you have learnt about handling media and producing content with that particular type of media.

Before we get in to all that, I am going to recap everything that has been covered in the previous four tutorials.

The focus of the very first tutorial was the creation of a graphical image using Adobe Photoshop. From this tutorial you learnt how to set up a Photoshop project, how to create a background with a gradient, how to manage layers and how to create image/graphic content in Photoshop.

The second tutorial concerning the creation of an animation via Photoshop informed on how to set up the background, how to create the content to animate, how to setup Photoshop in order to create animations and how to animate layers in Photoshop.

With the third tutorial, we moved from using Adobe Photoshop to using Audacity in order to record and edit audio. Within this blog post, knowledge was imparted concerning how to prepare for the recording of a podcast on a particular topic, how to record using Audacity and how to carry out edits of audio using Audacity.

For the Adobe Premiere Pro tutorial, I got you to create a slideshow with accompanying audio, text and transitions. This tutorial informed you on how handle different types of media in Premiere Pro such as text, audio and images. This tutorial also provided you with an insight into how to carry out story boarding as a method of planning the content of the slideshow.

Now onto our current multimedia related endeavour.

This fifth Multimedia related tutorial will get you to produce a multimedia item/project which contains all of the main types of media which are:

  • Text.
  • Graphics/images.
  • Animation.
  • Audio.
  • Video.

The multimedia project that you choose can consist of any of the following:

  • A compilation video of some of your favourite memories and experiences.
  • A trailer for a film.
  • A documentary or short film.
  • A short comedy sketch.
  • A video to inform or educate.

You can undertake any project that you so desire as long as it meets these requirements:

  • The final product/outcome must contain all five of the main types of media.
  • The graphical image content and the animations must be created via Adobe Photoshop.
  • The audio content must be produced or edited within Audacity.
  • You must use at least one of the creative planning techniques that have been described in the previous tutorials such as a plot description/summary, a full and complete script, a storyboard or concept designs.

The main areas that will covered in this particular tutorial: (It may be helpful for you to open up all of the previous tutorials as a reference or additional guide for this project that you are undertaking.)

  • The Creative Planning Process for the Multimedia project.
  • The creation of the graphic content.
  • The creation of the animation content.
  • The creation of the video content.
  • The creation of the audio content.
  • The creation of the final video.

For the sections of this tutorial which specifically focus on the types of media, I will provide an overview of both the creation of the media and how it is relevant for my personal multimedia project.

The multimedia product that I will be producing will be a cooking video of one of the themed meals that I have been involved with two of my friends and flatmates every week or two. The theme of the meal is Italian and I will serving an Antipasto as the starter and custom made pizzas for the main course.

Part One: The Creative Planning Process.

During the previous tutorials I have explored or talked about three main methods of planning the content of a multimedia project. These methods includes a storyboard, a summary of the plot/content and a script/s as well as creating concept designs.. For this tutorial, the three methods that I will be using will be the creation of concept designs, storyboarding and several short scripts for spoken audio aspect. These types of creative planning will be utilised so that my planning of the project content is as comprehensive and thorough as possible.

For the planning, we shall create a summary or brief overview of the content of the multimedia video. Then scripts will be produced for the media elements that require the creation of a script such as the audio narrations. Concept designs will also be produced for the opening logo and animation of this multimedia video.

The planning process will also focus on one media type at a time in relation to when that particular media type will be used. For our project the first form of media is a graphical image for the main logo. Depending on the project that you have chosen the purpose of the logo may differ. In the case of this project, the logo will inform the audience on the creators of the multimedia video.

Creating concept designs is that best way to plan the nature of the logo because it will allow us to develop an idea of the style, font ,colour and the background. Feel free to play around as much as you like in order to find out which colours and fonts will suit the logo the best for your project.

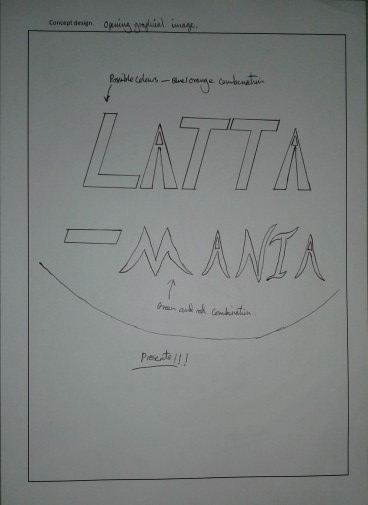
Refer to the concept design examples below to see what an appropriate concept design should look like:

First concept design-Opening graphical image.

20161128_200928

The second set of concept designs that we need to produce will be for the opening animation for the studio after the logo. Consider all of the aspects of the opening animation so that you make the most out of the planning. Making your design choices now will make things easier later on in the production of the multimedia video.

Second concept designs-Into animation.

20161128_200948

With the concepts designs complete we are in a good position to proceed with the creation of the Graphical element and the first animated element of the multimedia video because we have considered design options such as font style and colour.

The next phase of the design planning process is the creation of a storyboard plan in order to establish the order of the multimedia content within the video as well as the text and transitions/effects that will be included.

Storyboarding is a very useful creative planning tool to use because both design and creative decisions can be made before the project starts. In addition to this less issues concerning the content will be encountered during the production of the main multimedia video.

Images of the storyboard.

20161128_200821

20161128_200836

20161128_202741

For your convenience I have contained the storyboard template in this tutorial for your personal use.

storyboard-template

The final set of creative planning that needs to be carried out is the scripts for the audio narrative aspects of the multimedia video. The audio for this video has the purpose of detailing/explaining what is transpiring during each video segment.

In writing the script for your audio, it is important to write the content of each narration in a manner which corresponds with your video content.

Below I have attached all of the over relevant creative planning documents for you to view including the script element and the document consisting of the concept design template.

concept-design-template

multimedia-video-content-plan-and-scripts

Part Two: The Graphic.

The graphic element of my video/project, consisting of the five types of media, will be the opening message at the beginning of the multimedia video. This aspect of all of the multimedia video both fulfils the graphical image element and the text element of this multimedia project.

In order to produce the graphical image that we want we will be using Photoshop. So go ahead and open up Adobe Photoshop CC or whatever version of Photoshop that you prefer to use. As soon as Photoshop has been opened create a new project and set the pixel dimensions that were used for the Photoshop project setup within the first tutorial.

Reminder: The project dimensions can be 595 for the height and 842 for the width but the default Photoshop project dimensions can also be used.

Next apply the two colour gradient for the background by selecting the two colours that you want and dragging the cursor within the project while the gradient tool is selected.

With the background set you can now create the text element of the opening message.

Here is what the main opening message for the multimedia video looks like:

latta-mania-logo

The ‘LATTA’ text layer has the following Photoshop design features :

  • The layer text has been set to ‘Myriad Pro Italic’ for the font.
  • The set font size is 24.
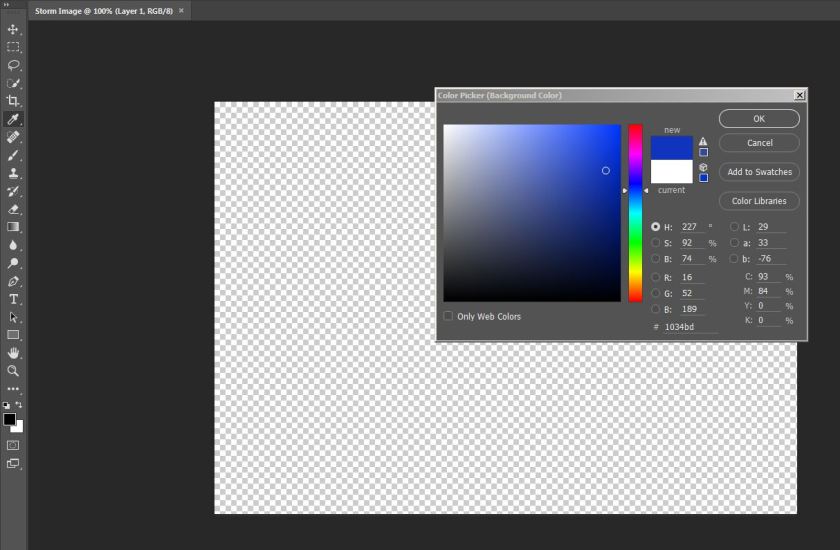
  • The colour that can be seen in the image below has been applied to the layer.

latta-layer-colour

  • In terms of the options available from right clicking on the highlighted text layer, ‘Sharp’, ‘Faux Bold’ and ‘Faux Italic’.

main-right-click-menu

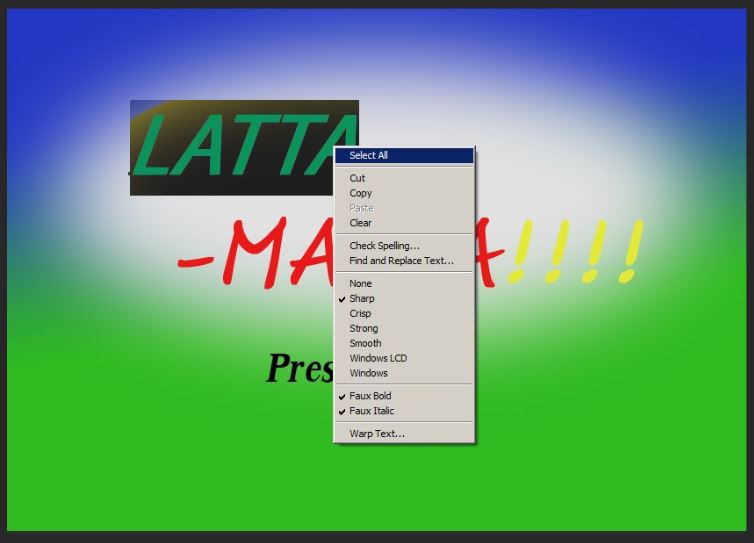
In terms of the “-Mania!!!” text layer, I have incorporated the following text features:

  • The font that has been selected is ‘Sketch Flow Print Regular’. The font size that has been set is also 24 for this particular text layer.
  • The colour for ‘-MANIA’ is a variation of the colour red with the settings that can be seen in the image below.

maniacolour-layer-1

  •  The colour for the exclamation marks within this particular text layer that has been applied is a version of the colour yellow.

maniacolour-layer-2

  • ‘Sharp’, ‘Faux Bold ‘ and ‘Faux Italic’ have also been applied to the text layer of this graphical image.

With the final text layer of the message which displays ‘Presents’, the following font, size, colour and styles have been attributed to the layer:

  • The font is ‘Kodchiang UPC Bold Italic’.
  • The font size that has been set to 16.
  • The colour of the layer is black as demonstrated by the image below.

maniacolour-layer-3

For this graphical image an additional layer has been added which blends in with the background. This was achieved by first drawing an ellipse via the ellipse drawing tool.

Important reminder: Make sure that the newly generated ellipse shape is behind all three of the text layers. This can easily be achieved by clicking on ‘Layer’ on the menu at the top of Photoshop. The click on ‘Arrange’ and ‘Send to Back’ in order to move the ellipse layer behind the text layers. Consult the image below for further clarity in this particular matter:

layer-adjustment

In order to make the ellipse appear as though as is blending into the background layer, in the properties for the layer you need to click on the ‘Masks’ Properties icon which looks like a white box with a circle in the centre.

mask-property

In the properties enter 45.6 for the Feather in order to make the white ellipse blend in with the background of the image.

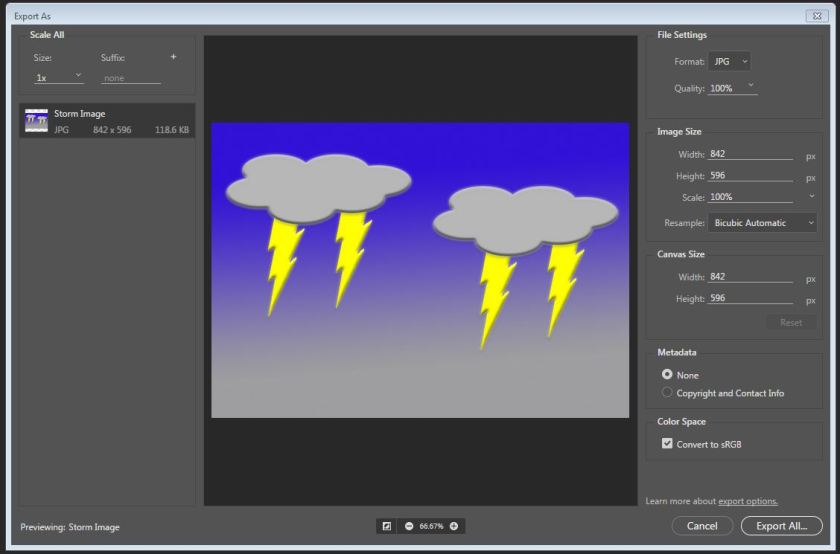
With the graphical image produced in the manner that is required, the Photoshop image can be exported as a JPEG image file.

To export the image go to ‘File’, ‘Export’ then ‘Export as’ and adjust the export settings if required. Next choose the save location after clicking on export all. Your project is now saved as an image file which will be added to the multimedia video project file later on in the tutorial.

The opening message for the cooking video has now been successfully produced. We can now proceed with the first animation aspect of the multimedia video.

Part Three: The Animation.

The first animation aspect of the tutorial will an opening animation proceeding the logo informing the viewer of the production company/studio (imaginary in this case) responsible for the creation of the multimedia video.

For the animation we will need a graphical image that will be animated. Using the concept design that you have produced for the opening animation, produce another graphical image using your knowledge of Photoshop and what has been discussed in ‘Part One’ and the first tutorial of this series.

When you have produced all of the content/layers in Photoshop that you want to be included in the animation, we can now set up Photoshop for animating.

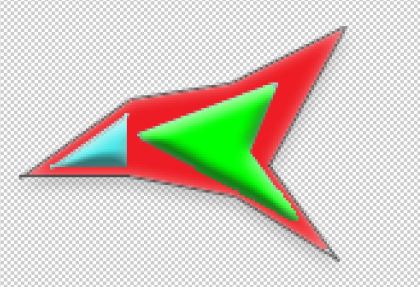
Before we proceed, here is the corporate identity/studio icon for the animation that has been produced in Photoshop which will be animated.

studio-icon-animation

For the creation of the layers that can be seen in the image above, a tool was used that I have not discussed in any of the tutorials prior to this one. The tool in question is the ‘Transform’ tool which can be found under edit. The transform tool can edit the size and shape of any shape layer within Photoshop. For the case of this particular image which is to be animated, the specific transform tool that was used was ‘Warp’ which allows you to manipulate a shape in any way.

We are now in a position to create an animation in Photoshop.

Please follow these steps in order to set up Photoshop for animating:

  1. Go to the ‘Window’ menu at the top of the Photoshop user interface.
  2. Locate and click on ‘Timeline’ in order to open up the timeline.
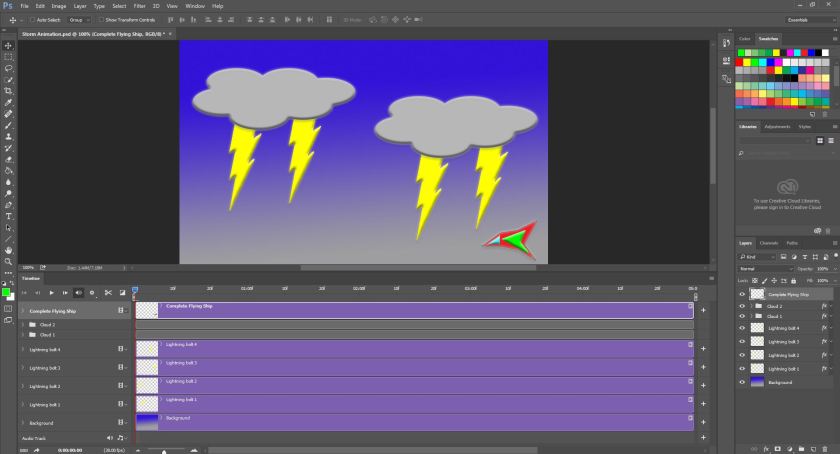
  3. When the timeline opens within Photoshop, you will need to click on ‘Create Video Timeline’ so that all of the project layers will appear within the timeline so that they can be animated within Photoshop.

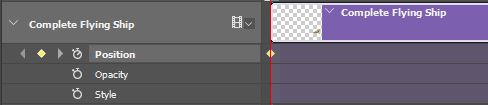
For the purpose of this tutorial the first layer that will be animated will be the main studio logo in the centre of the image. For this layer key frames will need to be added to the animation timeline. Key frames can be added by clicking on the arrow left of the layer within the timeline and click on the stop watch next to ‘Position’ to create the first key frame. The next step is to move the timeline position along to the timeline to the desired location and click on the yellow diamond icon which is also next to ‘Position’ in order to create the other required key frames.

You may consult the image below to have a visual understanding of what the ideal locations for the key frames are within the timeline.

keyframe-locations

Another important thing to make that sure you do is to move the layer outside of the project space so that it can fly in.

For the purposes of this animation key frames have been added at the beginning and the end of the timeline. Next drag the position setter with the red line to the end of the layer and drag the layer into the centre of the project space. Doing this will automatically create a key frame.

Even though only two key frames have been made for the main symbol layer you are not limited by the number of key frames that can be put into the timeline. Adding more key frames may a good idea because it gives you more control concerning how the different layers move across the screen. The first key frame for an individual layer can be placed at any point in the timeline. This means that not all of the layers need to be animated at the same time.

Important: If text layers are being animated then the icons next transform will need to be selected to create the key frames for moving text content.

Please take this opportunity to experiment with animating layers in Photoshop. The animation which featured at the top of tutorial 4 is a good example of an animation that uses multiple key frames in each layer.

The steps for exporting the animation as a GIF file have not changed. To export the animation go to ‘File’, ‘Export’ and then ‘Save for Web (legacy)’ to open up the export settings window in Photoshop. If you are happy with the settings click on ‘Save’ to choose the save location for the GIF file then click on ‘Done’ to finish.

Below you can see the final introduction animation with all of the layers animated.

Well folks,

So far we have produced the opening graphical image and the opening animation. In accomplishing this we have already met three of our requirements due to the fact that we have created content containing three of the five main media types. These media types are text, graphical images and animation.

The next content to produced is the main bulk of the multimedia project which is the filmed video and spoken audio. Musical audio content can also be added if we feel that our projects will strongly benefit from incorporating this form of content.

Part Four: The Video and Audio content.

Before we can proceed with the editing and constructing of the multimedia video which is the focus of this final tutorial, the filmed video and audio content will need to be filmed and recorded.

With the filmed content, a camera, phone or other filming device is suitable. The video content of the final multimedia cooking video will be videos of the preparation of the pizzas and the accompanying dishes.

In the case of the narrative audio segments, they will be recorded using Audacity which is the software that was used for the creation of the ‘Doctor Strange’ film review podcast for the third audio themed tutorial. The audio content The audio content of the multimedia cooking video will be a selection of voice over narratives concerning each section of the preparation and cooking process.

As has been mentioned at the end of ‘Part One’ of this tutorial,  it is important that a content plan for the main multimedia video which contains an overview of the content of the video has been put together. The content plan should also contain all of the scripts for the audio sections and which filmed content corresponds with the narrations. This is something that must be planned and thought out before the filming and audio recording is carried out.

With the content plan produced and the storyboard set out you can now film the preparation of your meal/feast or whatever content is the focus of your multimedia project.

When the filming is complete, the narrations can now be recorded in Audacity.

Here is reminder of the basic features of Audacity to refresh your understanding of how to use the software:

audacity-user-interface-2

  • Select the red circular button under ‘Effect’ in order to start and stop the creation of the recording.
  • The other icons that can be seen adjacent to and near the record button are used for playback purposes including the play button, a stop button, a pause button, a button for returning to the start of the audio segment and a button to jump to the end of a particular audio segment.
  • The are also tools/features of audacity which allows you to edit the audio tracks that have been produced.
  • The Selection tool selection-tool allows you to select certain parts of the audio by clicking the curser and highlighting the desired area.
  • The Envelope toolenvelope-tool can be used to adjust the volume of parts of an audio track by placing markers to narrow or widen parts of the track.
  • The Drawing tool draw-tool has the purpose of making adjustments to the waveform/shape of an audio track.
  • The Time Shift tool time-shift-tool allows you to move/drag audio tracks to any position in the timeline of the audio.

Personal recommendation: When it comes to recording the audio narratives I suggest recording in small sections so that it is easier to place the audio segments with the relevant aspects of the video content when it comes to compiling the media elements in Adobe Premiere Pro .

Make sure that you save and export all of the audio files when you are happy with the narrations for the multimedia video that have been recorded.

Compiling our media within Adobe premiere Pro.

Good news EVERYONE!!!!!

With the graphical image and animation created within Photoshop projects, the video content filmed and the audio recorded we can now start incorporating the media elements together into the final video. The additional text elements that we require for the multimedia video will be created within Adobe Premiere pro as was the case with the ‘Fantasy Character Roster’ slideshow in the forth tutorial.

Important reminder: It is highly likely that a lot of editing will need to be carried out in order to for the multimedia content to be at the quality and standard that we want. The editing process may well be a lengthy process so make sure the devote enough time, focus and patience to this important stage in the project development.

The very first that needs to be done is to import all of our media into Premiere Pro.

To import the media that we need in our main multimedia video, go to ‘File’ and then click on ‘Import’. A window will open which allows you to highlight the files for importing or to select a whole folder for importing.

Depending on the location of the media files, the import process may need to repeated a few times especially if the media files are in slightly different folders/directories.

This is a handy import method if all of the media files are in one location or folder but seeing as our the media that we need is in different locations then we will be using a slightly different method. The method that we will be using will involve using the Media Browser within Adobe Premiere Pro which is located in the bottom left corner of the Premiere Pro user interface.

video-editing-1

Using the Media Browser means that we can drag our files directly into the sequence editor and in doing the files whether they are image or audio will automatically be imported into the Project folder. The Project folder can be accessed easily  by clicking on the ‘Project: Main Multimedia cooking video’ tab next to the ‘Media Browser’ tab.

With the Media Browser open, drag all of your media files into the sequence editor.

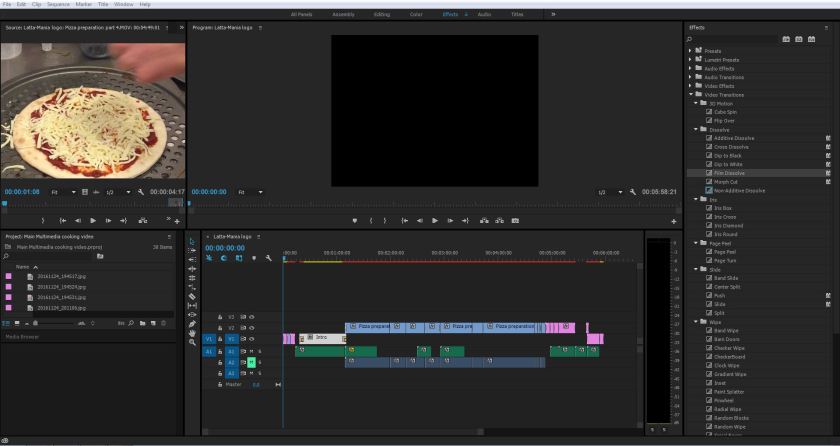
Here is what Premiere Pro should look like with all of the media files imported and added to the sequence.

video-editing-2

With all of the relevant media content added into the sequence, we can now start the editing process which will involve positioning the content in the correct manner so that all of the media files are in the required order so that the audio files are in the right position in the sequence/timeline to correspond with the particular video and image content. During the editing process, transitions will be added as well as text content produced via Adobe Premiere Pro.

For the first step in the editing process we will be making sure that our content is the right order so that the flow of content is correct as set out by the storyboard that we produced during the creative planning process for the multimedia video project.

This can be easily achieved by simply clicking on a particular video, image or piece of audio within the sequence and drag it to the desired position.

Important: Before you start editing make sure that the content fits the screen in the right way. All that you need to do is to click and drag the cursor over all of the sequence content to select all of the content and right click and select ‘Scale to Frame Size’ . Doing this will make sure that all of the media content of the final video is consistent in terms of size.

When the various media content is in the desired position in the timeline then we can proceed with carrying out edits on the individual elements of the video such as reducing the duration of some of the video content and removing parts of the video to make it seem more professional as well as to remove any unwanted content.

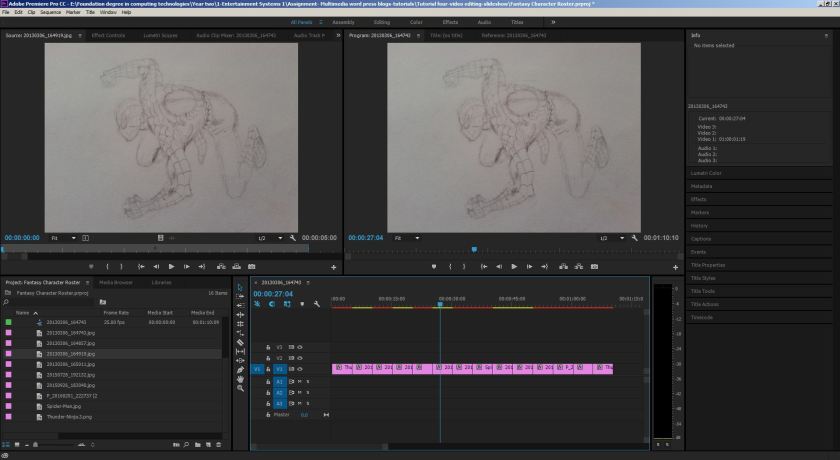
Here is what the project looks like at this stage with the content ordered correctly:

video-editing-3

Important: During the process of ordering the content, a useful  tool was used known as the ‘Razor Tool’. This particular content editing tool is useful because it allows us to split our media content into smaller sections which can make editing a lot easier. The tool is located within the tools panel left of the sequence editor and looks like an image of a razor blade.

video-editing-4

At the moment there is a lot of background noise in the filmed video content so the noise level or volume will have to be removed.

To do this you will need to click on ‘Audio on the panel navigation bar at the top of the Premiere Pro user interface. This will result in Premiere Pro changing into a layout that is suitable for adjusting the audio. When you have entered the audio editing set up, make sure that the ‘Audio Clip Mixer’ is selected like so:

Personal note: The audio of the filmed video content can also be muted in the ‘Audio Track Mixer’. Selecting either one is fine.

video-editing-5

In Premiere Pro the video content can be muted individually but there is a much quicker method which is to mute the whole track. This can done simply by clicking on the ‘M’ mute button for the relevant audio track which in this case is ‘A2’ which refers to the second audio track in the sequence editor.

Now that the video content has been muted we should have no trouble in hearing the audio narrations which we recorded previously in this multimedia project that is very near completion.

The next stage in the editing process is to trim done the preparation videos in length due to the fact that there is a lot of silent video that would stop the viewer from being engaged and drawn into the content that they are viewing especially if the audience has received the intended message. Most of the video content will be edited using the ‘Razor’ tool and as an example I will editing the first video segment. Before proceeding we need to make sure that the ‘Razor’ tool is selected.

To use this tool simply click on the areas where you want to split on the video and delete the unwanted clip. Do the same for all of the other clips if you so desire.

Inspect the image below to see how the project with the unwanted video segments removed.

video-editing-6

Now just drag of the content so that each media content is adjacent to each other while still in the intended order.

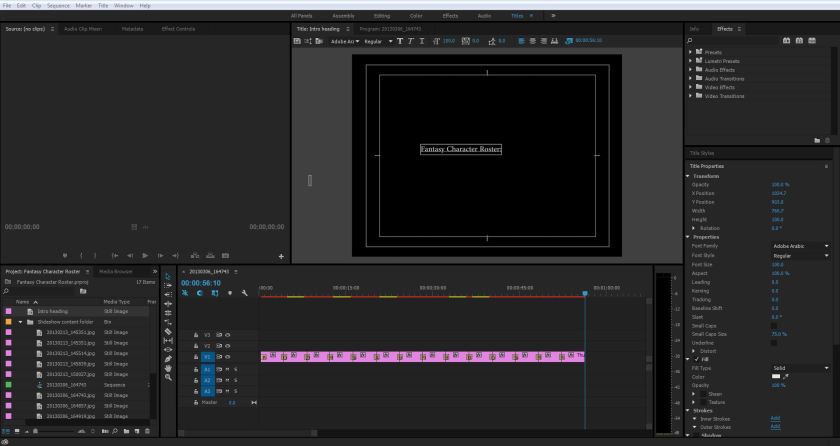
The final step in the whole of the editing is too add suitable text and transitions.

To apply effects select the ‘Effects’ panel to be able to view the effects window which appear near the top right of Adobe Premiere Pro and to add text enter the ‘Titles’ panel then go to ‘Title’, ‘New Title’ then ‘Default Title’ in order to create new titles throughout the video.

Before we export the final multimedia you may consult the image below to see what a Premiere Pro project looks like with all of the editing and transitions added.

video-editing-7

Part Five: The Exportation.

As soon as you are happy with the editing and the way in which the multimedia video has been put together we can now export and save our final multimedia video in order to complete this multimedia project endeavour of ours.

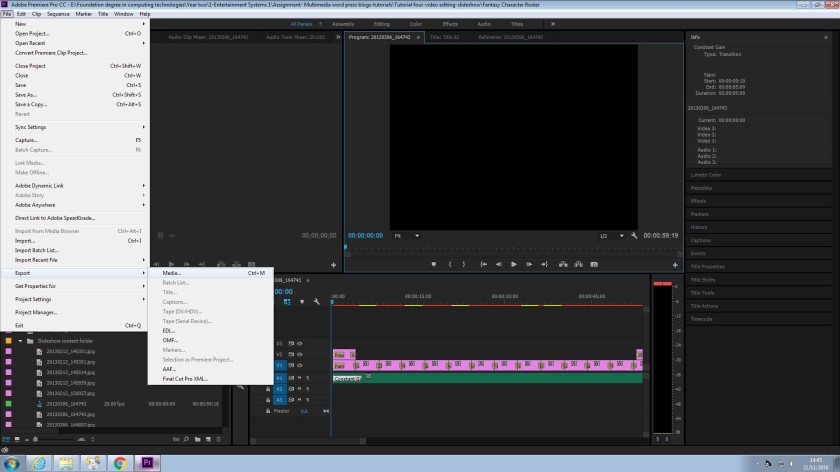
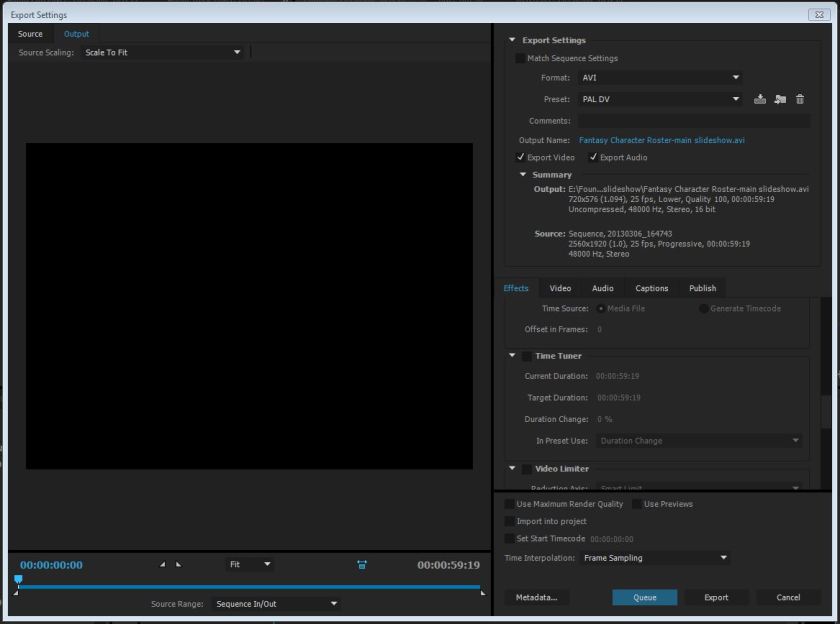
To export your completed video project go to ‘File’, ‘Export’ then ‘Media’ to open the export window. In the window click on the output name to choose the save name and save location then click ‘OK’. Finally click on ‘Export’ to export the completed project.

Part Six: The Demonstration.

Here is the final multimedia cooking video. I hope that you enjoy it.

Conclusion.

Congratulations Folks!!!

You have completed all five of the Multimedia tutorials.

The main skills that have been acquired includes:

  • How to plan a multimedia project.
  • How to carry out creative planning.
  • How to create different types of media content using different software.
  • How to combine different media elements into one Adobe Premiere Pro project.
  • How to edit different media content in Premiere Pro.

I hope that all of my tutorials have been useful and informative and thank you for taking the time to look at my five Multimedia tutorials,

Mike.


Posted in Multimedia Tutorial Four: Creating and Editing Video with Adobe Premiere Pro, Multimedia Tutorials, Premiere Pro

Multimedia Tutorial 4: Creating and Editing a Slideshow Video using Adobe Premiere Pro.


Contents:

Introduction:

Hey Folks.

Congratulations on completing the previous three tutorials. I hope that you still find these tutorials to be informative, engaging and entertaining.

The main area of this weeks tutorial will be video editing using Adobe Premiere Pro. This is an exciting topic for a multimedia focused tutorial because it gives us the opportunity to be very creative in the type of video that we are going to produce.

Through the use of Adobe Premiere Pro, a variety of different types of videos can be created such as a video consisting of a sequence of images like a stop motion short or a slideshow, trailers or advertisements, compilation videos and a short film.

For this particular multimedia tutorial, I will guide you through the process of creating a slideshow in Adobe Premiere Pro. The images that will be included within the slideshow can be of anything as long as all of the images all share the same contextual relevance.

For my Premiere slideshow I will be using a selection of drawings of superheroes and fantasy characters that I have produced over the years.

The areas that will be covered in relation to video editing and slideshow creation will be:

  • How to plan the contents of your video or slideshow using a storyboard.
  • How to import media into Adobe Premiere Pro.
  • How to carry out any necessary edits in Premiere Pro.
  • How to add audio to a Premiere Pro project.
  • How to apply the use of text to a video project in Adobe Premiere Pro.
  • How to apply effects to Adobe Premiere Pro.
  • How to save and export the video/slideshow that has been created.

Part One: How to plan your Adobe Premiere Pro project with a storyboard.

Before we start creating our slideshow, the content of the slideshow will need to be planned. One of the best ways of doing this is through the creation of a storyboard. Creating  a storyboard means that you can plan every features and aspect of your Adobe Premiere pro project. In addition to this you can visualize how your slideshow or video will flow along with what accompanying features or effects will incorporated at each point/image in the slideshow.

This particular planning method will allow you to have a clear idea in your head of what you will be creating in Premiere Pro.

In the images below you can see a storyboard that I have produced for a slideshow that I will be making in Adobe Premiere Pro. This storyboard has been drawn by hand but you may produce it digitally if you so prefer.

20161116_22015320161116_22021320161116_220230

As you can see within the images, each box has a sketch along with annotations for the  effects such as the transitions.

Also attached is a blank template for you to create your own storyboard for your slideshow or other type of Adobe Premiere Pro project if you decide to go a different way.

storyboard-layout

Using a storyboard to plan your slideshow or video is a good idea because it allows you to plan the order of the images in the slideshow along with what effect/transitions will be used, when text will be used and what audio will be included. The storyboard is just for initial planning and organisational purposes so changes can be made in the production of the main slideshow if you feel the changes would improve upon the quality of the slideshow. These changes perhaps may include the order of the images, the effects, the text and the choice of audio if there is another piece which is more suitable to the project in question.

Part Two: How to add/import media into Adobe Premiere Pro.

Before we start importing our media, we will need to create a project file. This can be done simply by clicking on ‘New Project’.

set-up-1

After you have clicked on ‘New Project’, a new window will open will give you the option to choose the name of your project.

set-up-2

When you are happy and you have selected the save location, you may click on OK. This will make the full Adobe Premiere Pro user interface accessible for the creation of your slideshow or video.

The user interface should appear as something like this:

set-up-3

We are now in a good position to start importing the media that we want.

In order to create our slideshow in Adobe Premiere pro we will need to import the media that what to include in our slideshow. Before we import our chosen images into Premiere Pro, I recommend putting all of your desired images for the slideshow into one folder/directory. I am suggesting that you do this so that it is easier to access your chosen images for importing while in Adobe Premiere Pro.

This is only one method of importing media types such as images into a Adobe Premiere Pro.

For the purposes of this tutorial, we will importing the entire folder of images into Premiere Pro. You can achieve this by simply going to ‘FILE’ and then clicking on ‘Import’.

import-1

import-2

As you can see in the image above, we can now select the folder containing the images that we desire. When the intended folder has been selected, click on import folder in order for the contents of that particular folder to be accessible within Premiere Pro.

import-3

The image above informs us what the user interface will look like when media has been imported. At this stage in the proceedings I have clicked on ‘All Panels’ at the top but we return to the effects layout later on in this tutorial.

Part Three: How to create a sequence(slideshow) out of the images.

So far so good Folks.

Now we can get into the main fun part of creating our slideshow. The easiest way to go about this is by highlighting all of the images, right clicking on them and selecting ‘New sequence from clip’.

Like so:

slideshow-1

Despite this method being useful I will not be using it. This is because the order of the images in the imported folder is not the order that I want for my slideshow.

I will now double click on the image that I want to make sure that it is the correct one and drag it into the sequence section of Adobe Premiere Pro.

slideshow-2

As set out by the storyboard that I have previously produced, this Spider-man drawing is one of the images that I want to be at the beginning of the slideshow but there is an image that I feel should go before it. This is a good example of when you don’t have to strictly adhere to your storyboard.

If you didn’t add all the images to the sequence at once then drag the rest of the images into the sequence while staying true to the order that you have decided upon.

slideshow-3

When you have added all of the images to the sequence, your Premiere Pro project should resemble something similar to the image above.

IMPORTANT: It is vital that all of your images fit on the screen in the correct manner. To make sure that this is the case you will need to select all of the images currently in the sequence by dragging your curser over the images. Then you will need to right click and click on ‘Scale to Frame Size’.

Part Four: How to add transitions and effects to your slideshow.

Now that all of the images has been added into the sequence we can now add transitions and effects to make our slideshow a lot more interesting. Before we start adding transitions and effects, will we need to enter the editing mode in Premiere Pro. This can be simply achieved by clicking on ‘Effects’ near where it says ‘All Panels’.

slideshow-4

The image that is below will inform concerning how the effects user interface for Adobe Premiere Pro appears.

slideshow-5

Adobe Premiere Pro has a variety of different effects and transitions that can be utilized for our slideshow/sequence of images. As can be seen in the storyboard towards the beginning of this particular multimedia tutorial, I have stated which transitions and effects are most suitable for my slideshow.

Before you add your effects I recommend that you adjust the duration of each image if required. To do this place the cursor over the right edge of an image in the sequence manager and drag left or right to reduce or increase the duration. You will need to move the rest of the images along to make room for the image that you want to increase the duration of. If you want to be more precise then you right on the image, select ‘Speed/Duration’ to type in the duration that you would like. For my slideshow, I am reducing the duration to four seconds.

IMPORTANT: Make sure that you drag the images together so that there are no gaps in between each one in the sequence.

The adding of a transition or effect is the same as adding your imported media into the sequence manager. All that is required is to expand the folders within the effects panel and select the effect that you want to use at a particular point in the sequence and drag it into the sequence. Make sure that it is attached to two images in order to have a successful transition. The effect will clip on to the corresponding media that you place it on.

Refer to the image below to see what a sequence of effects with added transitions should look like from an editing point of view.

slideshow-6

Part Five: How to add/implement text into a Premiere video project.

Now that we have added transitions to our slideshow we can now add text at any location. In the case of this tutorial I will be adding a title at the beginning and the end of the video.

The first thing that needs to be done is to click on ‘Titles’ one the panels menu in order to open the title editor in Adobe Premiere Pro.

The next step is to go to ‘Title’ then ‘New Title’ and click on ‘Default Still’ within the drop down menu.

slideshow-7

After you click on ‘Default Still’ a small window will appear allowing you to apply the name of the title file in Premiere Pro and any changes to the settings for the text.

slideshow-8

Click on Ok and a text editor will open within Adobe Premiere Pro in which you can create your text and determine its style and any other features that can be added.

In the editor, click anywhere and type your text/title. The image below should provide you with an insight into Premiere should at this point in the creation  of our slideshow.

slideshow-9

With our text created we can apply changes in terms of the style and properties so that it appears for more visually appealing.

To change the style of the text/title, we need to select the ‘Style’ drop down panel in the ‘Titles’ panel. This will open a selection of style options which we can then edit further.

Refer to the images below for further clarity on this particular matter.

slideshow-10slideshow-11

You can select any style that you from any of the style options for text within Adobe Premiere Pro.

For my intro title, the style that I have chosen is Hobo Std Slant Gold 80.

This is what the text looks like at the moment:

slideshow-12

Next I am going to change the colour scheme of the text using the ‘Title Properties’ drop down panel.

Within ‘Title Properties’ I am going to change the colours of the ‘4 colour gradient’. This can be achieved by clicking on each of the small cubes next to colour or color with the properties. Look at the two related images below to see a visual representation of what has been done to the colour of the title.

When the point has been reached in which you are happy with the text that has been produced then you can go ahead and add the title to the sequence editor.

Like with the other media and effects in this project, just drag the text item from the relevant project panel into the sequence at a desired location.

slideshow-15

Like we did previously with the images in our slideshow, add any appropriate effects or transitions and adjust the duration accordingly.

You can also follow the text creation steps again if you would like to have a closing piece of text.

The image below depicts what our sequence should look like so far.

slideshow-16slideshow-17

Part Six: How to add audio to your video project.

Well Folks!!!

The latest segment of this joint venture of ours is nearing its end but there is still a little bit more to do.

If you want to add more features to your slideshow then you can add audio. To get an audio file into your Adobe Premiere Pro project you just need to follow the import steps that we carried out when we imported our images. As soon as the audio file appears in the media content for the project on the bottom left, drag your audio into the sequence manager and place it in one the ‘A’ rows. You can edit the audio and apply effects and transitions as you see fit for your slideshow.

This is what your Adobe Premiere Pro project will look like with audio added to the sequence:

slideshow-18

For the purposes of my slideshow I will be using a segment of music from the original score of ‘Guardians of the Galaxy’.

Next we will cut down the length of the audio media so that we have the segment that we want to play along side the slideshow. In order to make the editing of audio easier in Premiere Pro, I recommend entering the Audio interface setup via the panel navigation at the top.

To reduce the length of the audio file, simply click on the edge of the audio bar and drag in the opposite direction.

When you have cut down the audio to segment duration that you prefer, we can now add audio transitions. For the audio in my slideshow I have used the ‘Constant Gain’ transition at the beginning of the audio with a duration of 5 seconds.

At the end of the slideshow, a thank-you message has been also been added.

Part Seven: How to save and export your video.

With the slideshow completed and all of the extra content added, we can now export our final Adobe Premiere Pro project. This is very easy to do. Just go to ‘File’ then ‘Export’ and click on ‘Media’.

Slideshow 19.jpg

A window will now appear allowing to choose the final settings for the video as well as the video name and save location.

slideshow-20

Click on the file name next to ‘Output Name:’ to choose the file name of the exported slideshow as well as the save location. Click on ‘Export’ when you are happy with the settings. This will encode all of the media content in the slideshow.

Well done folks.

You have completed all of the steps and have successfully created a slideshow in Adobe Premiere Pro. Please feel free to admire your work to the extent that you deem appropriate.

Part Eight: My slideshow- Fantasy  Character Roster.

Here is the slideshow that I have produced using Adobe Premiere Pro.

Conclusion:

CONGRATULATIONS EVERYBODY!!!!

You have all successfully created a slideshow/sequence of images using Adobe Premiere Pro.

The areas that have been covered in this tutorial have been:

  • How to use a storyboard in order to plan the contents of the slideshow.
  • How to add and import your media into Adobe Premiere Pro.
  • How to go about creating a slideshow or sequence of images in Adobe Premiere Pro.
  • How to incorporate effects and transitions into the slideshow.
  • How to add audio and text.
  • How to export the final slideshow that you have created.

The final tutorial in the series will contain all of the multimedia aspects that we have explored so far.

I hope that this tutorial has provided you with a useful insight into both the technical and the creative side of Adobe Premiere Pro.

I look forward to seeing you for our final Multimedia adventure.

See you all soon,

Mike.

Posted in Audacity, Multimedia Tutorial Three: Recording and Editing Audio with Audacity., Multimedia Tutorials

Multimedia Tutorial 3: Recording and Editing Audio and Creating Podcasts with Audacity.

Contents:

Introduction:

Play the recording below to start the tutorial.

http://vocaroo.com/player.swf?playMediaID=s0931YKdO1fl&autoplay=0
Audio recording and upload >>

The areas that will be covered in this tutorial are:

  • How to plan the creation of a podcast.
  • How to plan the content of the podcast via the use of a complete script or plot summaries to expand upon.
  • How to go about creating a recording using Audacity.
  • How audio can be edited using Audacity.
  • The steps to go through to create a complete Podcast concerning a particular subject matter.

Part One: Planning your Podcast.

In the case of planning stage of the podcast, personally I find the best planning method for me is to decide on the subject matter or topic of discussion, to decide on the sections of the podcast and what will discussed in each section. A plan of this type will provide us with a good starting point for the Podcast.

If you look at the document below you can see my plan for a podcast which will discuss and review the film ‘Doctor Strange’ which I saw recently.

podcast-plan-screenshot

Click on the link below to open the document:

main-podcast-planwordpressedition

As you can see within the plan above, I have stated the main topic area along with the main sections/discussion areas of the podcast and the points that will be discussed in each section.

Part Two: The Script or the Plot (Summary points).

In writing any form of creative content for media such as films, graphic novels, comic books and audio discussions such as podcasts there are two methods/approaches to doing this. The first approach is to write a complete script for the content that is being produced which in the case of this tutorial is a podcast. Of the two approaches, producing a complete script is the far more detailed approach due to the fact that every sentence that will be spoken has been planned. Writing a script may be beneficial for certain individuals who finds it easier to plan every word in advance prior to the main recording and editing session.

Even though there are numerous benefits to producing a script there are also a few disadvantages with the use of a script such as the podcast may seem a bit less natural due to the fact that the content is being read word for word off a piece of paper but if you are a highly natural speaker then this may not be a problem. It is because of this fact that I will mainly using the second approach. Some parts of the podcast will be scripted such as the introduction.

The second approach is to produce brief summary points, in relation to personal thoughts and ideas towards the film, on what is to be discussed in each section. Doing this allows for a more natural discussion. To continue my preparation for the film review podcast I will build upon my initial plan by adding bullet points for my thoughts about each aspect of the film such as the portrayal of the main character and the plot. In doing this I will have focus points of discussion during recording. I have chosen to use this method of preparing a podcast because the podcast will be a discussion between two individuals and the use of a script will be to limiting in this case. In addition to this the dialog will be natural just like any in depth conversation about a particular subject and that it not something that can be easily scripted.

For this particular type of podcast, having brief summary points of thoughts and ideas is a more appropriate form of content/discussion preparation because the podcast needs to be an open discussion of specific discussion areas that can be expanded upon. This is very much the case for this podcast because the conversation will progress in a natural manner that cannot be predicted by a script.

There may be types of podcasts that may benefit from having scripted content such as if a particular subject matter required a lot of in depth knowledge and expertise then the preparation of the podcast will have to very in depth in terms what it going to be said.

For my readers out there, it is up to you to decide which approach to preparing the spoken content of your podcast bests you. This very much depends upon the topic that is being discussed and which method best suits that topic as well as which method both benefits you as the producer of your own podcast. It may be the case that a combination of both of the methods is the best way to go about it.

Here is my fully prepared plan with added thoughts and ideas concerning the film.

podcast-discussion-preparation-1podcast-discussion-preparation-2

Click on the link below to open the document:

podcast-discussion-preparation

Part Three: Recording using Audacity.

How that you have fully prepared your podcast content I will now show how to record using Audacity which is very easy to do.

Firstly make sure that Audacity is open so that all of its features are visible. The user interface for audacity should appear something like this:

audacity-user-interface

In the top left hand corner of the user interface there is a row of buttons. These are the buttons that we will focus on for carrying out the recording. As you can see there is a pause button, a play button, a stop button, a return to start button, a skip to the end button and most importantly a record button which appears in the form of a red circle. This is the button that you will need to press in order to start recording in Audacity.

Consult the image below if necessary for further clarity:

audacity-user-interface-2

As is most likely obvious, the stop (square) button will stop the recording session as soon as you have said everything that you wish to say within your podcast.

There are two ways of going about recording using Audacity. You can either do the recording as a whole or in smaller segments. Recording the podcast in segments might be easier from an editing point of view. Having small and manageable chunks of recording makes it is easier to locate a particular part of the podcast that will require editing in some form or removing.

For recording using Audacity it may be helpful to have a microphone or a headset particularly if you laptop or computer does not have an inbuilt microphone.

An Audacity project with a particular set of recording should appear something like this:

audacity-user-interface-3

Part Four: Editing using Audacity.

When you are happy with the recording that has been carried out. We can now carry out any required editing in order to make our podcast the best quality possible. Audacity has a few main editing tools such as :

  • The Selection Tool– As hinted at in the title the selection can be used to select or highlight any part of a recording/track that is required. This is a useful feature if editing is required on a particular part of a recording.  selection-tool To use the selection tool in Audacity you just need to click and highlight the area of a track or recording in order in order for that section to be selected.

The relevant image below should provide all my readers out there with an insight into how a selected segment of Audio within Audacity will appear.

selection-tool-demo
Selection Tool
  • The Envelope Toolenvelope-tool This particular Audacity tool has the main purpose of reducing or increasing the volume of particular parts of a track or recording within Audacity. In the event of this tool being selected then purple lines will appear on the borders of any open tracks in Audacity. This means that you can carry out any adjustments in volume. You may want to adjust the volume if you want to enhance certain parts of the audio tracks or if there is background noise that you don’t want any listeners of your podcast to hear.
  • In order to carry out these necessary adjustments in volume, you need to click on the relevant area on the purple lines within your tracks or recordings so that markers are placed. It is required that there should be more than one marker to make sure that you successfully adjust volume accordingly.
  • When you have placed your markers you can either narrow the track to reduce the volume or widen the track to increase the volume. This can be achieved by drag the purple border line inwards or outwards.

This particular image demonstrates how the Envelope Tool is meant to function.

envelope-tool-demo
Envelope Tool
  • The Drawing/Draw Tool- draw-tool  The Draw Tool in Audacity is a tool which gives you the choice to make manual adjustments to particular parts of the waveform of a track. The image below which relates to this tool should provide to all my avid readers a sense of additional clarity to the nature of this tool.
  • To use the drawing tool you also need to zoom in using the zoom tool.zoom-tool Zooming in  makes it easier to see the edit points in any track or recording. This is what a piece of audio will look after being edited with the Draw Tool.
draw-tool-demo
Draw Tool
  • Another important tool in Audacity is the Time Shift Tooltime-shift-toolThe Time Shift Tool allows you to move tracks to any point in audio timeline. This can be handy for adding additional segments of audio in between tracks. You can simply achieve this by drag the track left or right depending on where in the timeline you want the audio track or recording to be placed.

Audacity also has plenty of other editing features including the handy Zoom tool as well as a whole range of effects in the effects drop down menu which allows to edit your audio in may ways such as by changing the pitch, the tempo or the speed. Some of the Audacity effects can help with improving the clarity of the audio within the tracks/recordings. In terms of the podcast that we are producing via Audacity, try to use as little effects as possible because we what to have our podcasts sound as natural and authentic as possible. In addition to this we also don’t want to turn our carefully thought out discussions into a gimmick by applying effects to make our voice sound funny. There may well be certain types of Audacity projects that will benefit from the use of such effects but not particularly in this case. A significant bit of experimentation may be required I order to find which effects work best.

Now that the basics of recording and editing audio in Audacity has been covered you can go ahead and create your podcast.

Please feel free to take as much time as you need to get fully prepared for creating a podcast. There is no rush.

Part Five: The Podcast.

If your podcast has been completed in terms of the recording and editing and you are happy with the final result then you can go ahead and export your podcast as an audio file.

Exporting and saving a podcast in Audacity is a simple feat to accomplish. All that is required of you is to go to ‘File’ and click on ‘Export Audio’. A box will appear, like the one below , which will allow to choose the save location then another box will appear which lets you enter the artists name and the track name among other optional choices of details for the exported audio file (a podcast in this case).

 save

After choosing a save location and clicking on save this warning will appear but you just need to click on ‘OK’.

warning

You can now enter the details of the Podcast that you have produced when this box appears.

edit-metadata

It is not required that you fill in the data fields. Click ‘OK’ when you are happy. Your podcast has now been fully saved and exported.

And now for the finale. Here my Podcast which is a film review of ‘Doctor Strange’. ENJOY.

Conclusion:

WELL DONE EVERYBODY!!!

You have all successfully created a podcast using Audacity.

In this particular tutorial we have covered:

  • How to plan and prepare for a podcast.
  • How to record in Audacity.
  • How carry out any editing that is required in Audacity.
  • How to export and save our podcasts as an audio file.

For my fourth Multimedia tutorial, the main subject will be video editing via Adobe Premiere Pro.

I hope everyone has found my audio themed tutorial useful and I am very grateful for anyone who has taken the time to look at my blog.

See you Folks next time,

Mike.


Posted in Multimedia Tutorial Two: Creating an animation via Photoshop, Multimedia Tutorials, Photoshop Tutorial Two: Creating Animations in Photoshop., Photoshop Tutorials

Multimedia Tutorial 2: Creating GIFs and animations in Photoshop.

Contents:

Introduction:

Hey folks,

Welcome back to the world of Photoshop. It is now time to immerse yourself in the creative world of animation.

For this second installment in a series of five tutorials, concerning how to use different types of multimedia, I will guide through the steps or stages required in order to successfully create an animation using Photoshop. In the case of this tutorial, the animation will be a ship moving or flying across the screen.

The areas that will be covered in this tutorial will be:

  • How to create an animated GIF using layers consisting of an animated background and an object that will interact with the storm in a particular capacity.

For the animation that will be created we will be using the storm image that we created during the last tutorial as part of our animation. The aim of this animation is to have an animated storm along with a character or ship of some description flying through the storm.

Part One: Applying the background for the animation.

Before we can proceed with this tutorial we will need to set up our Photoshop project. Refer to the instructions in the previous tutorial concerning how to set up a Photoshop project.

For the animation that we will create, we will using the storm image project that was created during the first tutorial along with all of the layers in the project.

There are two easy methods of doing this you can either have the old project open at the same time as the new project and simply select all of the layers for the storm image at the same time, using the technique that you have already acquired from the previous tutorial, and drag them into the new project. The layers may require moving into the correct and desired position.

The most simple way though is to open the version of the Photoshop project before it was saved as an image file and simply rename it from ‘Storm Image’ to ‘Storm Animation’. It is highly important that you do this because we want to keep the original Photoshop project that the contents of this tutorial were derived from.

At the moment the this is what your Photoshop project should look like.

project-start

As soon as the project has successfully been opened and another version has been saved with a different name, we can proceed with creating the ship in Photoshop that will be attempting to navigate the storm during the animation that we are in process of creating.

Also once we have all the content and the layers that we are going to animate, the lightning and the clouds will be animated along with the moving or flying ship.

Part Two: Creating a flying ship in Photoshop.

In order to create an animation we will need something to animate which in the case of this particular animation tutorial will be a flying ship. For this segment of the tutorial I will take you through the steps for creating a flying ship in Photoshop.

The ship does not have to be anything fancy or particularly intricate.

For drawing the ship that we are going to animate will be using the line drawing tool.

To make it easier to create the ship you may need to hide all of the other layers so that we have a blank space.

Draw your ship using the line tool until it resembles the ship in the image below.

ship

This is what the ship should look like before being filled.

Good job.

Important: Make sure that you group the line layers together and then merge the group before proceeding with filling the ship.

We now have our ship. To finish it of all that we need to do is to add the necessary fill colour and effects.

As we did in the last tutorial, you now need on right click on the gradient tool and select the paint bucket tool from the options that have appeared on the screen.

Then go to swatches and select RGB red as the fill colour. You may choose any colour that will stand out against our storm themed background.

coloured-ship

The following blending options/effects have also been applied to the ship:

  • Inner Glow.
  • Outer Glow.
  • Drop Shadow.

We could settle for having a simple ship but why not make it look slightly more interesting.

Use the line tool, the paint bucket tool and the blending options to add detail which looks like this:

complete-ship

Remember it is important that you remember to group your line/shape layers and then merge the group before filling and applying effects.

When you are happy with the ship that you have produced, you can go ahead and make all of the other layers visible once again.

The next image should provide an insight into how the project we are working on should look at this stage in the game.

project-image-2

Part Three: Setting up Photoshop to create an animation.

Great work folks.

You have all succeeded in creating the all of the necessary content or layers that we are going to animate. This means that we can now set up Photoshop so that we can create the animation which is the focus of this tutorial.

In order to be able to animate the layers, we will need to open up the timeline panel.

All that is required for carrying this out is by going to windows and then clicking on timeline. Like so:

setting-up-a-timeline

A timeline should now appear within your project that looks like this:

timeline

As you can see on the image of the timeline, there is a select option to create a video timeline. Go ahead and click on ‘Create Video Timeline’.

video-timeline

As you can see, all of the layers that we have created have now been added to the timeline. This puts us in a very good position for doing a bit of animating in Photoshop.

Part Four: Animating the layers.

Good news folks.

We are now ready for to start the fun part. Its time to do some animating.

For this particular animation, the ship will be flying through and dodging the storm while the lightning bolts appear and disappear.

To start with we are going to animate the ship so that it is flying through the storm.

The first thing that you need to do is to select the Flying Ship layer in the timeline then expand the layer so that you can see three options consisting of ‘Position’, ‘Opacity’ and ‘Style’.

animate-1

In order to be able to animate, we will need to create key frames at certain points in the timeline. The first one will be at the start so click on the stopwatch icon next to ‘Position’.

This will create a key frame at the start of the animation timeline.

animate-2

We now need another key frame that is half way through the animation timeline. For this we need to move the tool that adjusts the position within the animation timeline too about the 2 minutes and 30 seconds position and create another key frame by clicking on the diamond icon next to the stopwatch.

animate-3

At this point we can move the ship. Make sure that the ship layer is selected and move the ship across the work space diagonally until it is at a halfway position on the screen.

animate-4

In order to finish animating the ship, we need to make a final key frame at the end of the animation timeline. We will now need to move the timeline position adjuster to the end of the timeline and click on the diamond again for a key frame. In doing this we can finish animating the ship.

animate-5

Nearly there folks.

Now all that needs to be done is to move the flying ship in the same manner so that it disappears of the edge of the screen.

animate-6

The ship has now been fully animated. You can click on the play button within the timeline tool to preview how the animation should look.

Part Five: Saving the project as a GIF.

Well done everyone, the ship and the storms have been animated in the desired manner.

We can now proceed to saving our project as a GIF. To do this go to ‘File’ then ‘Export and the click on ‘Save for Web (Legacy)…’

The following box will appear.

animate-7

You have the option of having the final GIF looped as many times as you like. This can be done by clicking on the drop down menu next to ‘Looping Options’. From the drop down menu you can choose how many times the GIF will replay automatically.

Make sure that GIF is selected under ‘Preset’ and then click on save in order to save the GIF in a desired location.

Open up the file location for the newly made GIF and click on it too see the animation.

This is how the animation should look.

Summary/Conclusion.

Congratulations.

You have created your first animation using the Photoshop software.

The following topics have been covered in this tutorial:

  • How to use a previous Photoshop project.
  • How to create content to animate.
  • How to set up Photoshop for animations.
  • How to use the timeline tool.
  • How to animate a layer within the timeline.
  • How to save the file in a GIF format.

The topic of the next tutorial will be Audio.

Thank-you to everybody who has taken the time to read my tutorial and I hope it has been of use to you in learning how to create animations.

See you guys later,

Multimedia Mike.

Posted in Multimedia Tutorial One: Creating an image in Photoshop, Multimedia Tutorials, Photoshop Tutorial One: Creating still images., Photoshop Tutorials

Multimedia Tutorial One: Creating a Still Image in Photoshop.

Contents:

Introduction:

Welcome to the first Photoshop tutorial in a set of five Word press tutorials. For this tutorial I will guide you through the necessary steps and stages to creating a still image in Photoshop. For this tutorial you will be producing an image of a Storm.

This tutorial will contain specific areas that will be covered. These areas will include:

  • How to set up a project in Photoshop along with the particular dimensions that will be required for the project.
  • How create and manage layers.
  • How to create/draw and use shapes in Photoshop.
  • How to apply fill affects.

This tutorial will be divided into different sections in order to provide ease of use it terms of navigating the tutorial. The contents section above will allow you to jump to any section of the blog.

Part One: Setting up a Photoshop project.

First thing, open up Photoshop so that we can start the project. In order to set up Photoshop you will need to click FILE  then NEW which will open up a dialog box so that you can name the project and set the properties.

project-setup

For the purposes of this project, change the width and height from the centimetre setting to the pixel setting and change the dimensions to 595 for the height and 842 for the width. As soon as this has been achieved click the OK button in order to finish setting up the project. As soon as the project has been successfully been set up a white and grey checkered background will appear as demonstrated in the image below.

Part two: Choosing the background colours and adjusting the gradient.

For this next step, you will need to choose both the foreground and background colours.

This can be achieved by clicking, in the corner of Photoshop, on the small black box (for the foreground colour) and white box (for the background colour) which can be seen below.

background-and-foreground

In order to set the background to the required setting, click on the white box which result in a dialog box appearing which will allow the user to select the desired colour.

2-choosing-background-colour

For the purposes of this tutorial, set the colour values to the numbers that can be seen above. The resulting colour should be a form of Dark Blue. Click the OK button when the correct background colour has been selected.3-creating-foreground-colour

Now follow the same steps but for the foreground colour. The resulting colour should end up being Grey. Click on OK when the correct foreground colour has been selected.

Now that both the foreground and background colours have been set, we can now proceed with creating the gradient fill effect for the background. The first step in achieving this is to right click on the paint bucket icon, below the eraser icon, on the tools panel on the left hand side of the Photoshop user interface.

5-paint-bucket-select

Right clicking on the icon will cause a list of select options to appear. From the list of fill options that will appear click the gradient icon which is the square image with a gradient effect.

4-gradient-select

The gradient tool has successfully been selected so we can now proceed with creating the gradient effect that we using the foreground and background colours that we set earlier on in the tutorial.

When the gradient tool is selected the cursor will take the form of a cross symbol. This tells us that we are ready to create our gradient fill effect for the Background layer. In order to create the correct gradient effect, move the cursor towards the center then click towards the bottom of the project then drag the line towards the top of the project space while maintaining a straight line through the center of the Photoshop screen.

You may use the image below as an aid in achieving this stage of the tutorial.

6-gradient-creation

At this stage it is a good idea to change the name of the background layer to something far more distinguishable. All you need to do is double click on the name of the layer in the layer section of the Photoshop user interface and rename the layer to ‘Background’.

Consult the following image if required:

7-background-layer-rename

Part three: Creating and using images in Photoshop.

Now that we have the background the way we want it we can no move on to the next stage of creating the storm image content for the Photoshop image. This stage in the tutorial will involve of both cloud image content and thunder and lightning image content.

The important first task that we need to do is to select the shape that we will need to start with.

8-shape-select

In order to select the required shape, you will need to right click on the rectangle icon which is located above the hand icon. From the drop down menu that appears click on the ellipse tool icon as the shape that we need so that we can create a cloud shape.

In order to create a cloud shape we will need to draw multiple shapes but first start by drawing one in the top left region of the project space.

ellipse

We now need to change the colour of the shape to grey. All that is required is to simply go to the properties of the layer and change the fill colour to grey.

ellipse-colour-change

With the correct fill/colour established we need to duplicate the ellipse layer multiple times so that we use them to form a cloud shape. There are two ways of duplicating which are very easy. You can either right click on the intended layer and click ‘Duplicate Layer’ or go to the ‘Layer’ menu at the top and also click on duplicate layer.

ellipse-layer-duplication-2

Move all of the ellipse around until you have something resembling the cloud shape in the image above.

At this particular moment in our Photoshop endeavours we are faced with a slight dilemma in that all of the shapes that we used to create are all in separate layers.

You need not fear my  fellow Photoshop enthusiasts, the solution is simple. All you must do is click on the most top layer and then, while holding shift, click on the most bottom layer of the layers that you want to group which is all of the ellipse layers. With the layers selected simply drag them to the folder icon at the bottom of the layer tools. This will form a group with all of the layers inside. For convenience, make sure you rename the group to ‘Cloud’ or ‘Cloud 1’. As a result of this we can now move the cloud shape as a whole.

Well done folks for making it this far.

You know what they say. Two clouds are better than one. So lets go ahead and duplicate the layer so that we can have another one.

Duplicating the cloud group is easy just make sure that the Cloud group layer is selected.

Follow the duplication steps we carried out earlier and everything should be fine and dandy. Name the new cloud ‘Cloud 2’ and move the new cloud to a suitable location.

At this point you should have two clouds as the image below depicts.

storm-image-2-clouds

Another cool feature of Photoshop is that we can using blending options to edit how the clouds appear. Simply do this by right clicking on ‘Cloud 1’ and select ‘Blending Options’. A box will appear with a list of options for blending. In order to achieve the desired cloud effect select ‘Bevel and Emboss’, ‘Inner Shadow’, ‘Inner Glow’, ‘Outer Glow’ and ‘Drop Shadow’.  Carry out the same for ‘Cloud 2’.

We have the clouds, now we just need the lightning so that we can bring to an end the first segment of this joint venture of ours.

For the lightning bolt we will need a different type of drawing tool in order to create a lightning effect. For the lightning you need to return to the shape tool (where we previously selected the ellipse drawing tool), right click to open the sub menu and select the line tool.

For the purposes of this exercise, hiding the background may make it easier to draw the lightning bolt. To do this simply click on the eye next to where the background layer is in the list of project layers.

You can now proceed with creating a lightning bolt using the line tool.

You should end up with something like this.

lightning-sketch

Important things to remember to do:

  • Make sure that you group the layers for the lines used to create the lightning bolt so it can be moved around easily.
  • Make sure the cloud layers are in front of the lightning bolt layer. You can achieve this by clicking on the ‘Layer’ menu then ‘Arrange’.  For the lightning bolt layer select ‘Send Backward’ and for the cloud layers select ‘Bring forward’.

As soon as you are happy with the lightning shape you have drawn in Photoshop, we can now apply a fill as well as any additional effects. This is really important, before you apply a fill to the lightning bolt you will need to merge the layers within the group so that it can be filled with colour. This can be achieved by right clicking on the lighting bolt group layer and clicking on merge group.

For the lightning bolt layer, right click where the gradient tool is and select the paint bucket tool. Then go to the panel on the right and click on ‘Swatches’ and select ‘RGB Yellow’ as the fill colour then fill the lightning bolt.

You also need to apply these blending options:

  • Bevel and Emboss.
  • Outer Shadow.
  • Drop Shadow.

To finish off the Storm Image, duplicate the lightning bolt layer three times so that you have four lightning bolts. Then place each lightning bolt slightly under the clouds so top of the lighting bolts are not visible. Each cloud should have two lightning bolts.

Your Storm Image should look something like this:

storm-image-final

If you are happy  with how your Storm Image looks you can proceed with saving your Photoshop project as an image file.

Part Four: Saving your project as an image file.

To export your project as an image with a suitable file format all that you need to do is to go to ‘File’, ‘Export’ then ‘Export as’. This will cause a box to open which allow you to decide which image format you would like.

export

Click on the ‘Format’ drop down menu to change the file format. The file formats include JPG, PNG, GIF and SVG. For the purposes of this tutorial the image has been saved as a JPG.

Summary/conclusion:

WELL DONE!!!

You have completed the first in a series of Multimedia tutorials.

In this tutorial we have covered:

  • How to setup a project in Photoshop.
  • How to apply  a fill and a gradient.
  • How to create shapes in Photoshop.
  • How to apply blending effects.
  • How to use and manage layers in Photoshop.
  • How to save a Photoshop project as an image file.

Within the next tutorial we shall be exploring animation within Photoshop.

To all my readers out there, I hope you found my first tutorial to be beneficial to your Photoshop info needs and I look forward to imparting more wisdom to you soon.

See you soon,

Mike.

Posted in Uncategorized

INTRODUCTION TO MY BLOG

Hey Folks,

Welcome to Mike’s Multi Media Blog. The home of all things media related.

The main blog content of this site will be a set of five tutorials concerning how to handle different types of media such as Images,  Animation/video, Audio and Video.

I hope all you media enthusiasts and Photoshop users out there find my blog of a significant level of usefulness and meets all of your multimedia information needs.

I hope you enjoy my tutorial blogs,

Multimedia Mike.